Crabbing in Puget Sound is one of the most widely enjoyed recreational harvest activities. There’s nothing like that very first successful crabbing trip and later crab feast to mark the beginning of summer!
Crab is at its best during that first crab feast of summer. More on cooking crab later, this article is all about equipping you for crabbing success around Puget Sound.
To have success crabbing Puget Sound, we need to discuss a few things: Gear, Bait, Locations, and Strategy.
Here’s the latest news and blog posts about crabbing:
- Opportunities all 2025 in the PNW to hunt, fish and forage
- Puget Sound Crab Season 2024
- Puget Sound Crab Season 2023
- Puget Sound Crab Season 2022
- Puget Sound Crab Season 2021
The following is a video that might help you if you prefer a video format over a blog article:
Gearing up for Puget Sound Crabbing
Quick disclaimer: We are an Amazon associate, meaning our links to products you can purchase on Amazon provide us a small commission but it doesn’t change the price you pay.
These days, it’s extremely annoying to spend all that gas to go to a sporting goods store just to discover the gear you need is out of stock, so buying online with fast delivery times can be an important alternative.
Let’s start with crab pots, the most important thing for crabbing in Puget Sound is not to overthink it.
You could spend a lot of money on crab pots, but the regular old square folding traps will do just fine crabbing the Puget Sound. There are more important places to spend your hard-earned dollar!
We will need to do a few things to or crab pot before it’s ready to drop into the Puget Sound though…
Remember, the goal is not to JUST drop your pots…but to retrieve them, from the location you dropped them…and with crab in them. And for that, you need a bit more gear:
You will need a crab pot harness like this one to attach to each corner of your square crab pot.
You will definitely need line and I HIGHLY recommend you go with a lead core line.
The 5/16 in line in 100 ft length will allow you to do most of the crabbing you want to do and won’t tangle quite as much as 1/4 inch.
One sure strategy to lose your crab pots in Puget Sound is to use a floating line.
That line will get tangled in someone’s prop, who will then cut said floating line and you will never see your pots again.
For going deeper than 100 ft, I approach crabbing more like I do shrimping which means I have a custom-built line management system on a garden hose reel.
If you go this route, you can also go with 1/4 inch line.
The line management is not as necessary for shallow water crabbing in Puget Sound, but it can come in handy if you want to soak your pots deeper than say 80 ft.
I wouldn’t drop my pots in water deeper than 75-80 ft with only 100 ft of line. More on this in the strategy/location section. Also, more than 100 ft of line and line management can become a major challenge without a good system.
You will need a crab pot buoy like these.
Instead of having to worry about connecting your buoy and line with the proper knot, why not buy it all together? This is a cheap combo option to avoid tying it together later.
It’s required by law that you write your name, address, and phone number on your buoy. Use a permanent marker to ensure it will be there for a few years.
You never know, someone may call you one day after having recovered your pots. We’ve certainly made that call after finding someone’s crab pots adrift in Puget Sound.
Speaking of crab pot driftage…one of the most important gear and rigging up factors for puget sound crab is to weight your pots.
You can buy the weights and zip tie them in (change the zip ties every season):
These Beau Mac crab pot weights are great, but you will end up spending more on weight than on pots if you pursue that strategy. Here’s my approach to the cheapest weights possible for crab pots:

Go buy cheap masonry bricks and drill a hole in the middle of each one. Zip-tie them to the 4 corners of your cheap folding pot and you have a rock-solid setup.
You will need a masonry bit to do the drilling and not split the bricks. However you manage to add weights, make sure you do it. Every year in Puget Sound, crab pots go drifting off.
There are many derelict crab pots on the puget sound due to not weighting them properly.
Before we talk about bait, there are two bait rigs and one measuring tool you will want as well before undertaking your Puget Sound Crabbing adventure:
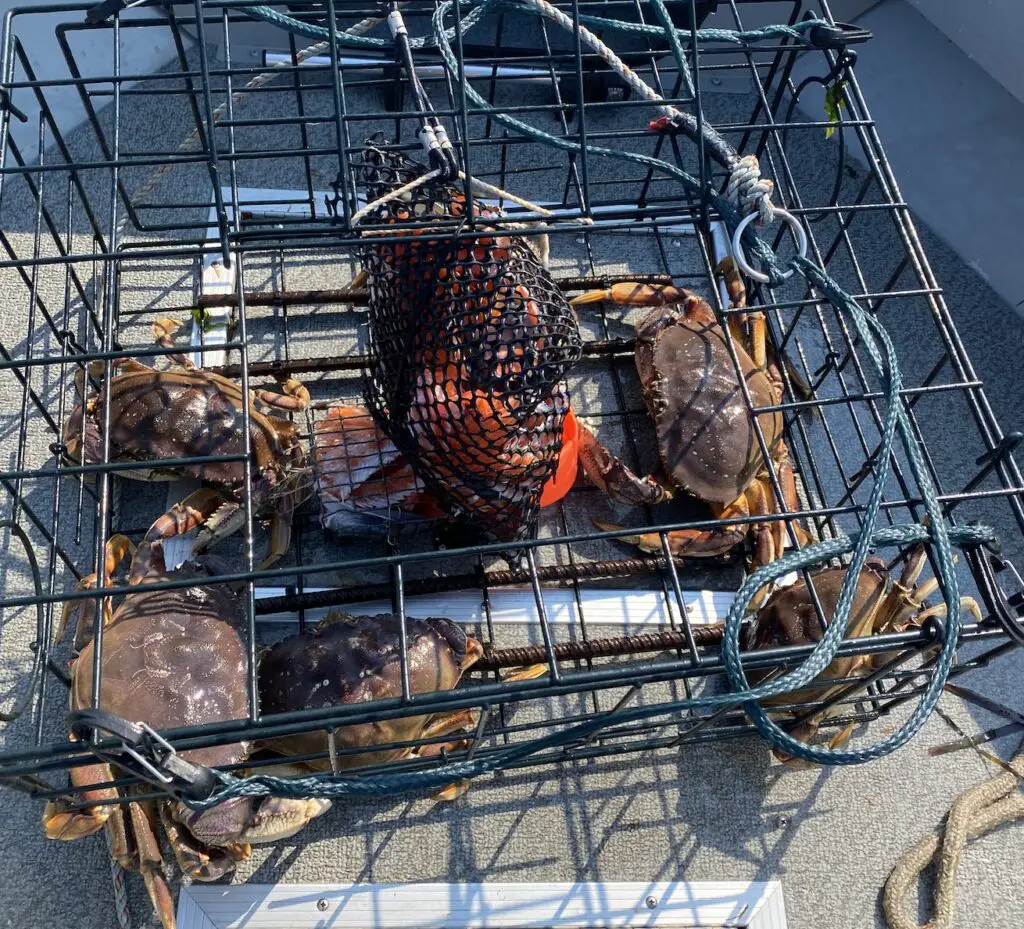
I use this crab bait cage to store hard baits like salmon carcasses, chicken drumsticks,, and what not. Makes it a bit harder for the crab to get at the bait.
If they chew threw your bait, they are likely to look to escape from your pots which means they are no longer feeding and attracting other crabs to your pot. And yes, they can find a way out of your crab pots if motivated enough and the right conditions exist.
I use a bait barrel like as well to store “broadcast bait”. Often similar to what I use for shrimping…it’s not required for shallow water crabbing (< 70 ft) in the Puget Sound, but for deeper water and longer soaks it can be super helpful for drawing crab to your pot in that critical first hour.
You need a crab gauge that has markings for multiple states and types of regulations which can be helpful as the sizes in the ocean and in the Columbia river / Oregon are all different than the Puget Sound.
Finally, you may want to use a crab pot puller to save your arms, legs, and back pulling up heavy crab pots. It’s not required the same way it is for shrimping as the crabs don’t typically come out of the pot while it’s coming up.
I use this Scotty pot puller as it’s one of the cheaper options and has worked for me quite well. You will still use your back a bit to lift a pot over the rails of your boat, but you will save your arms in bringing the pot up to the surface.
You can also go the even more expensive route:
This more expensive pot puller will make it easier to bring your pot aboard your boat without having to lean over and lift it with your back.
Best bait for crabbing in the Puget Sound
Now we are on to a juicier topic: Bait! (see what I did there…). There are always folks asking about bait…I have a few rules and cheap tricks here that I will share to help you out:
The #1 best bait (don’t argue with me I’m a blogger!) for Puget Sound Crab (or anywhere!) is an albacore Tuna carcass/shavings.
I’ve seen just absolute insanity when it comes to crabbing with this bait. I’m talking deep water pots filling in less than an hour. It’s just nuts.
The #2 best bait for crabbing Puget Sound is razor clams. This is what commercials use, and they do this for a living.
Crabs go crazy for razor clams. If you’ve done some clamming on the coast this year, hopefully you saved the trimmings and broken clams, because this bait is dynamite.
Don’t have access to the above two? That’s okay because there’s hope for you yet.
The #3 best bait for crabbing Puget Sound is (drum roll please): Salmon! More than likely, you have a salmon carcass or two you can throw in your crab pot bait bag. What about that boot chinook you caught last year that you were going to smoke up and feed to your in-laws? Don’t…just don’t…
Salmon flesh works hella better than salmon carcasses and heads. Don’t put that crappy salmon in your smoker, put it in your crab pot and let your in-laws eat crab (happy spouse happy life amirite?)
Okay, now if you are reading this and you’re like “oh snap, I don’t have any of these, what can I do and still get crab in Puget Sound?”
Well, you are in luck! Because you can go the store and buy chicken drumsticks or thighs (bone in!). And, if you want your chicken to perform like the above 3 great crabbing baits, you can soak it in some special sauce. Here’s some special sauce ideas:
This crab and shrimp attractant is a great sauce to use to soak your chicken in which will provide great results crabbing in Puget Sound. But, there’s also a DIY version:
That’s right, the clam juice works incredibly well just like the razor clam! There’s one more idea though (do you see where this is headed?):
Yup, that’s right, you can add bloody tuna oil to your bait prep and get some of the awesome power of tuna shavings/carcasses even without going tuna fishing!
Or maybe try combining all three! Yum!
Where to crab in the Puget Sound
Okay, so you are all rigged up and baited up, now where the heck do we find crab in Puget Sound?
The obvious answer is to look at where all the red/white buoys are and drop your pot nearby…but not too close cause that’s really bad crabbing etiquette.
I will eventually have a location-by-location map set up, but for now, I will provide some general guidance that should help you.
Let me give you three ideas for finding Dungeness crab:
- In front of rivers and streams
- Sandy flats in 50-80 ft of water
- Sandy grades or flats in 80-250 ft of water
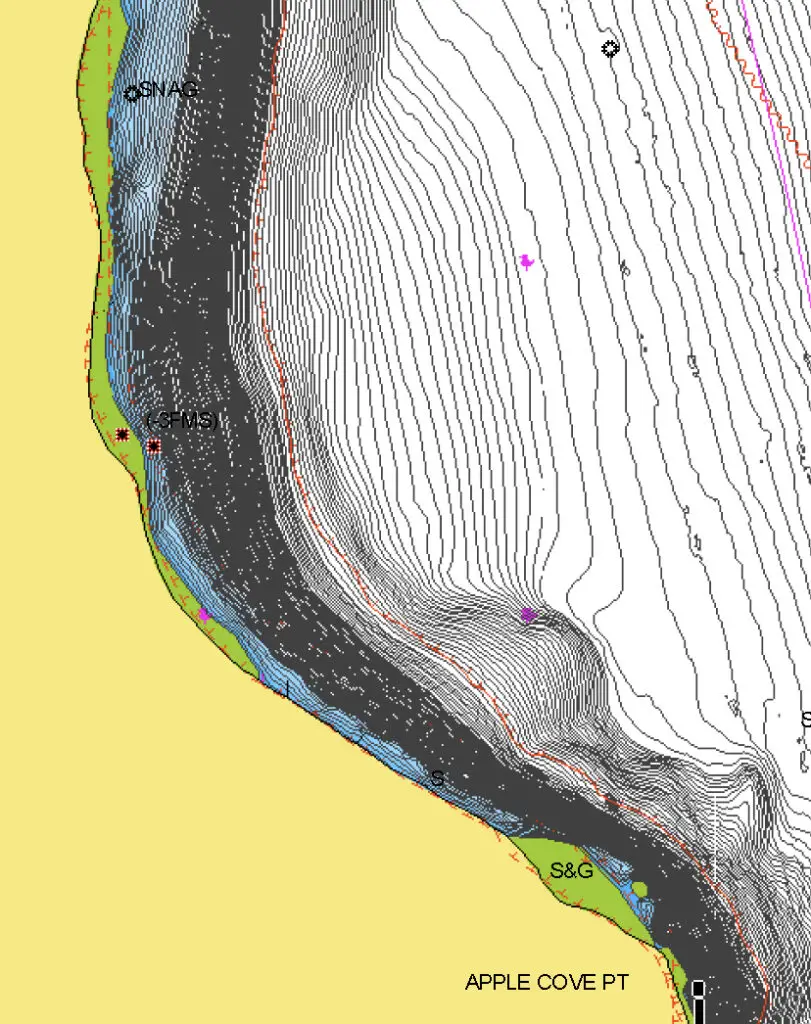
Finding Puget Sound Crab at the mouth of rivers and streams
Crab love to hang out at the mouth of rivers and streams. Why is that? Because freshwater is what brings a lot of biomass downriver.
Whether we are talking about spawned-out salmon or dead critters, it all gets washed downriver, and scavengers feeding near the mouth will find and “clean up” the biomass.
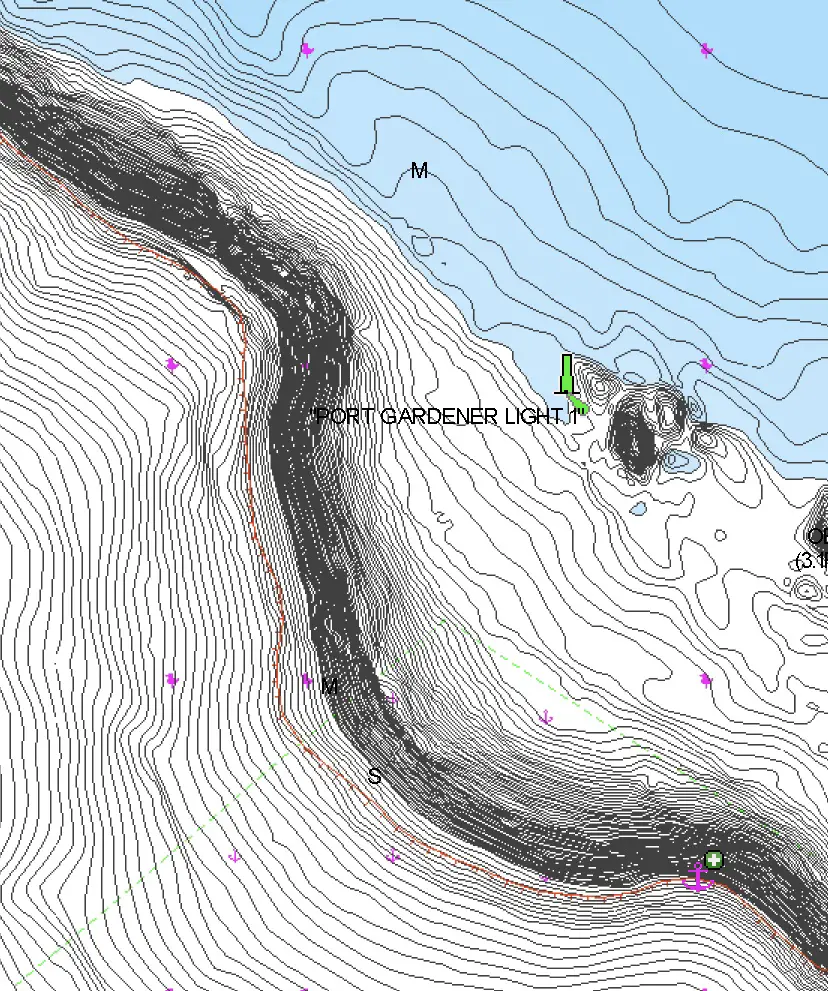
The above image of the marine chart shows part of the mouth of the Snohomish River in Marine Area 8-2.
This is a fantastic place to crab any time it is open.
You can find crab up on the shelf in 20-30 ft of water, on the beginning of the slope in 50-80 ft of water, or in much deeper water.
Beware of steep slopes in underwater terrain like this though because if your pots are not properly weighted (and sometimes even if they are), they can slide right down the slope.
Finding Puget Sound Crab in shallow sandy flats
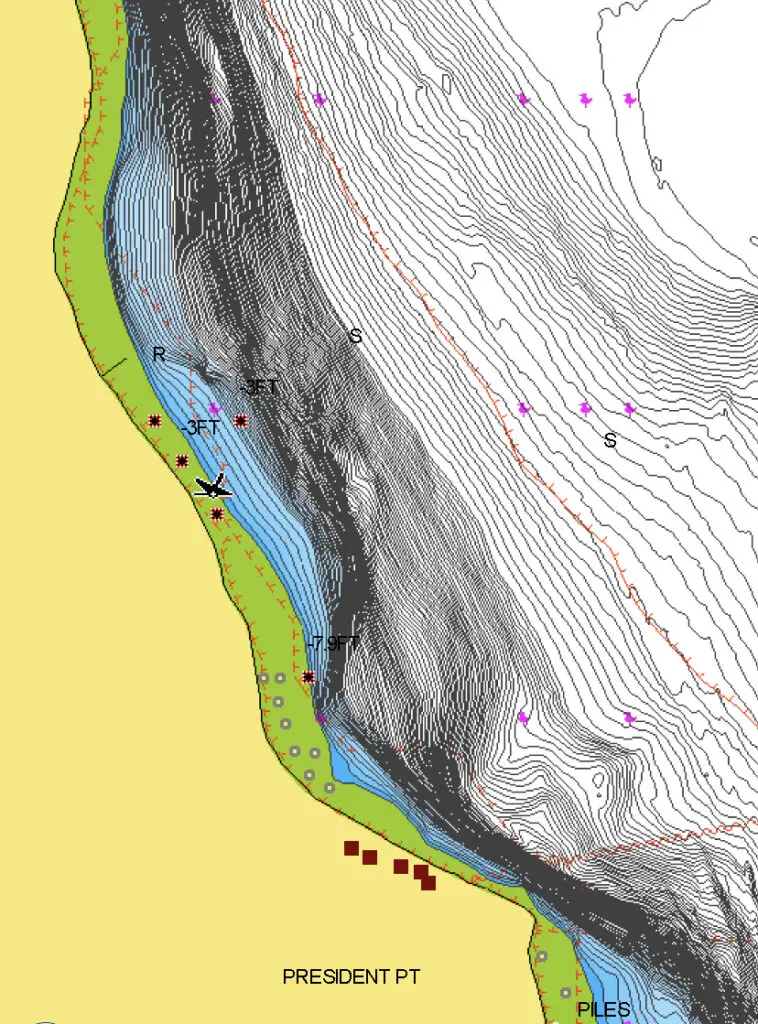
We are talking around 50-80 ft of water here typically before a more pronounced slope or grade usually takes us from 80 down to 200 ish ft.
How can you tell the bottom is sandy? Look at the shore closest to where you are crabbing. If it’s rocky, it’s likely the bottom where you are crabbing will also be rocky.
If you crab rockier areas, you are more likely to find the red rock crab than Dungeness.
The above pic shows a popular area to crab in Marine Area 10, which is the sandy flats between Kingston and Presidents Point.
Finding Puget Sound Crab in deep gentle grades or flats
I’m talking about the gentle grades that typically exist between 80 – 200 ft of water eventually flattening out before turning into another steeper grade. These are typically sand or mud, so the surrounding shoreline doesn’t matter as much here.
You will need to use longer soak times and likely employ broadcast baits for the best results here. My gear outside of the crab pot looks much more like shrimping gear at these depths.
Oftentimes, later in the summer as shallow water heats up and gets heavily crabbed out, you will find the best success in these depths. Pictured above is one example of many in Marine Area 9 – Apple Tree Cove, which is also good in shallower.
Successful Puget Sound Crabbing strategies
Now that we know the gear we need, how to rig it up, and how to bait it properly…and we have some ideas of where to find crab in our local Marine Area around Puget Sound, let’s talk about actual strategies.
Crabbing in Puget Sound is an activity that doesn’t really depend on the time of day, or sunlight, so it’s not like salmon fishing which can often require the early morning wake up…though it might. Let me explain:
Crabbing and certainly launching and retrieving your boat can be very tide-sensitive. Tides are a big part of creating current that influences how crabs find your pots and how they get into your pots.
Heavy current is often problematic for crab movement, so crabbing in time periods of massive tidal exchange can produce sub-optimal results.
I’m not saying you can’t get crab in those conditions, but that it is harder.
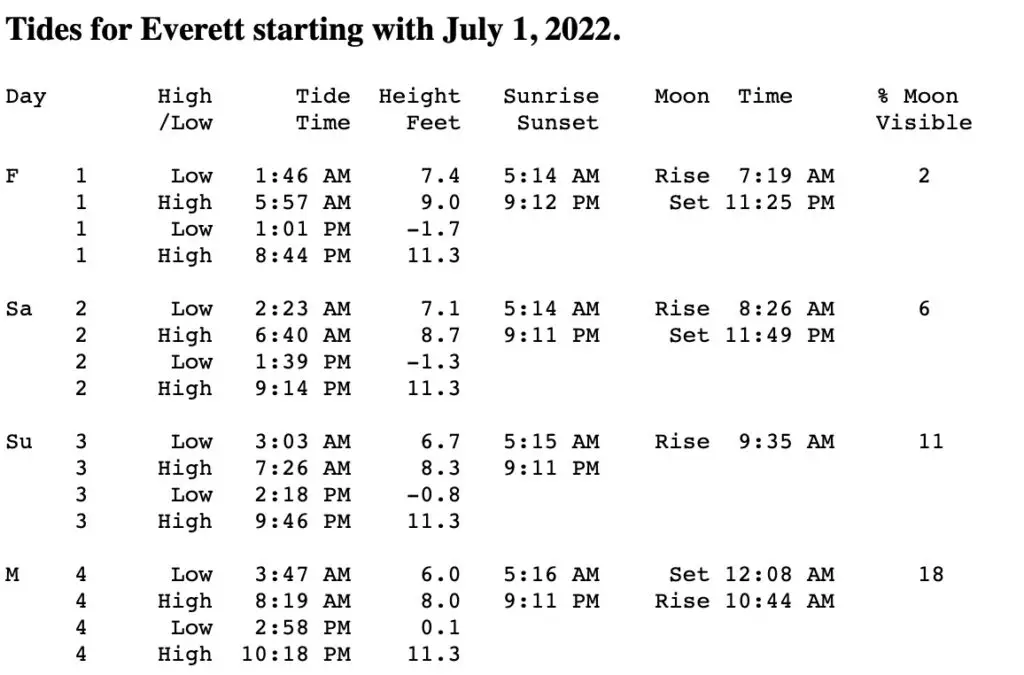
Take a look at the above for example on Friday, July 1st. I would probably be launching at 5 am, getting my pots down by 5:30, and getting off the water by 8:30 am.
Many places are difficult to retrieve many types of boats from within 2 hours of a minus tide, and I don’t want any part of the mess that happens at a launch as people scramble to get off the water.
Plus I’ve got 10.7 ft of tidal exchange to deal with between 5:57 am and 1:01 pm. So by about 9 am (midway through the tide cycle), the current will really be ripping.
Now you could also say, well, just launch at 4 pm…You still have a big tide movement from -1.7ft all the way to 11.3 ft that’s a total of 13 ft of tidal movement!
And, you often get a wind that kicks up in the afternoon in the summer that can make crabbing unpleasant depending on who you have on board or unsafe if it’s a really strong wind.
That’s why I would approach that opener as described above: And if my bait is good, and I pick a good location, I probably only need 3 hours to get enough keeper crab to have a wonderful crab feast that night.
Crabbing a new area, or on an opener when you don’t know exactly where the crab are…
There will almost always be other red/white buoys around, first of all, but you don’t always need to set yours at the same depth line as everyone else.
Go shallower, go deeper, and figure out what depth the crabs like to sit in various conditions.
Or go to the end of the line and if the bottom topography is still appropriate in terms of depth, flats, and sand, drop your pot at least 50-100 ft away from the other pots on the same depth line.
The way most pot drops go, is often you will get smaller crab into your pot first that will immediately start to munch on your bait.
This is a very noisy process and the bigger male Dungeness crabs are keyed into the sounds of other crab feeding.
They will make their way over as this process continues. Look at the above video for an idea of how it works.
Typically, I’ve noticed that most crabs that I would get into my pot on a given tide in a given area, especially in shallow areas, will be in my pot in the first hour of a soak.
So it’s a good idea to give your pots about an hour, plus or minus before checking them.
If after an hour you come up with shorts, females, mostly red rock or nothing, it’s time to move that pot (unless you are going for a much longer / overnight soak through multiple tides).
Licensing for Puget Sound Crab
It’s super important that you go to wdfw.wa.gov for all your crab licensing needs and information about legally crabbing the Puget Sound. What I post here may become out of date and unreliable as I’m not required to change it in a timely way (this is my disclaimer!).
Here’s WDFW’s official link to their page on crab regulations.
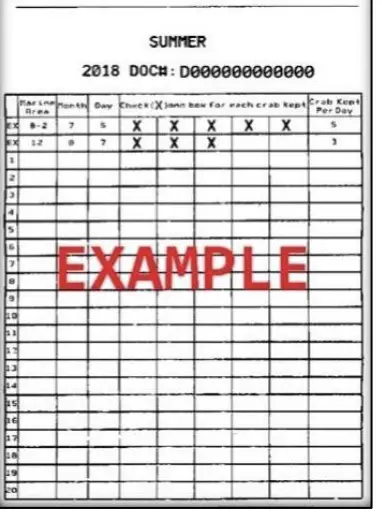
You will need an actual Puget Sound Catch card (crab endorsement) to legally crab for Puget Sound crab.
Also, you will need to turn this card in at the end of the season or fill a report out online or you will have to pay a fee the next time you attempt to purchase a Puget Sound Crab license.
Only male Dungeness crab measuring across the carapace a minimum of 6 1/4″ are legal to keep in Puget Sound.
Handling and Cooking Puget Sound Crab
What to do when you catch a Dungeness Crab in the Puget Sound?
First of all, you need to get it out of the pot and get the pot back down so you can catch more (assuming you don’t have a limit).
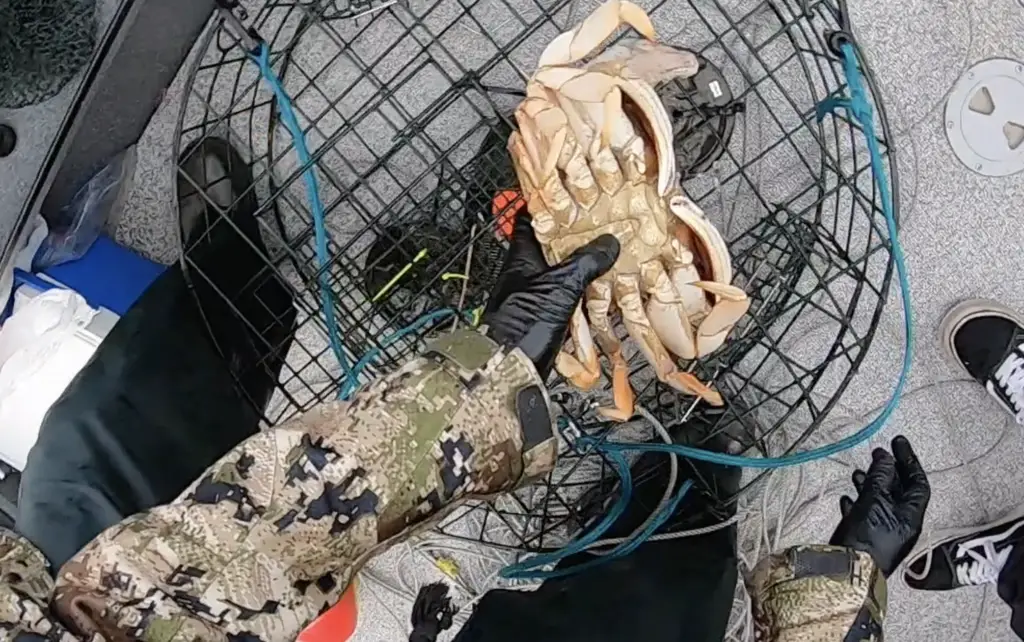
There are a variety of ways to safely handle a Dungeness crab, the photo of the male in the preceding section shows what I would call the most typical safe way. The thumb is placed on the underside and the other four fingers go on top.
What if you decide to reverse that and put your thumb on top with your four fingers on the underside?
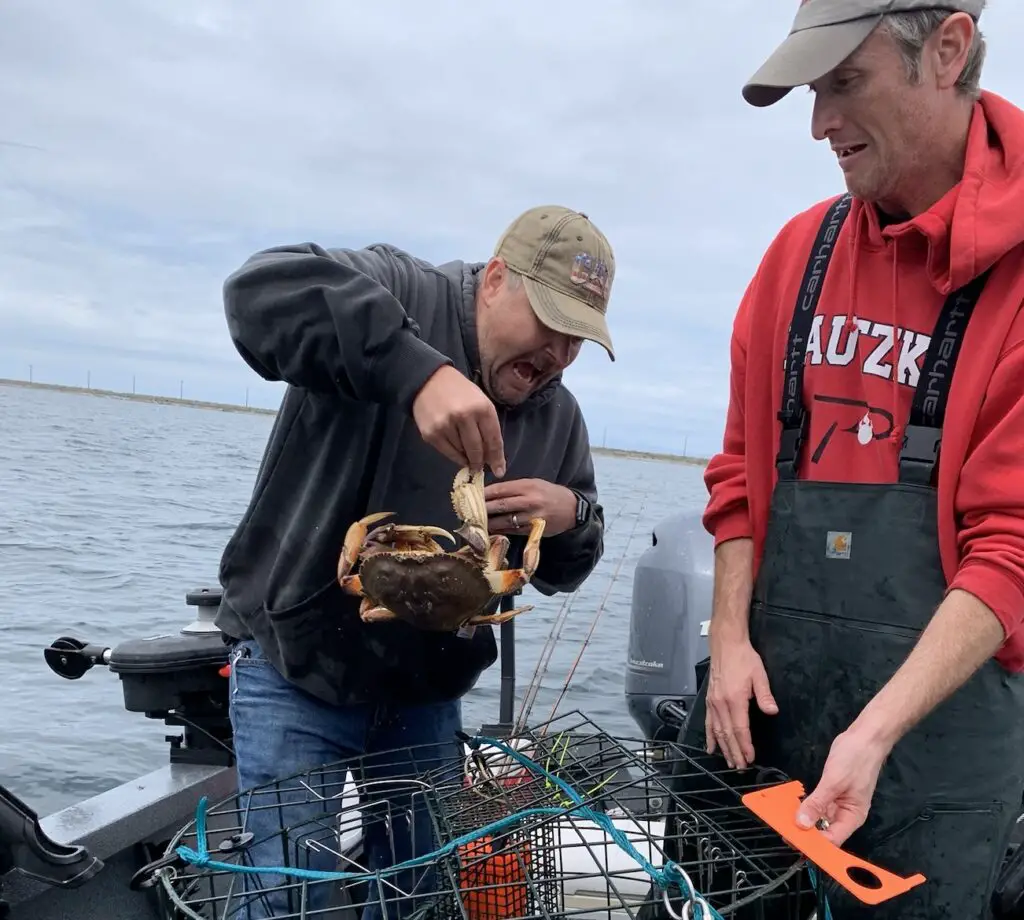
Notice which finger this beautiful dinner plate-sized male Dungeness crab has in his pinchers.
That’s right, the middle finger extends just far enough that the big male can reach down and grab it. It’s why the thumb is always what goes underneath the crab from the back.
What happened next, is my unfortunate friend flung the crab into the air about 20 ft behind the boat and we lost it, and his finger bled like crazy. Don’t mess around!
Now that you’ve safely taken the crab out, what’s next? You gotta keep it alive until you’re ready to dispatch it.
While some will put their crab in a holding tank that circulates water. I like to keep them dry and cold.
They will survive hours out of the water if they are kept in a dry cooler with ice. And speaking of ice, I use frozen water bottles so that as the ice melts it doesn’t create a pool of freshwater for my crab to die in.
And speaking of coolers…I just discovered an amazing cooler that keeps drinks, ice, beer and crab cold for a super long time!
This cooler is a beast! Checkout the photo below:
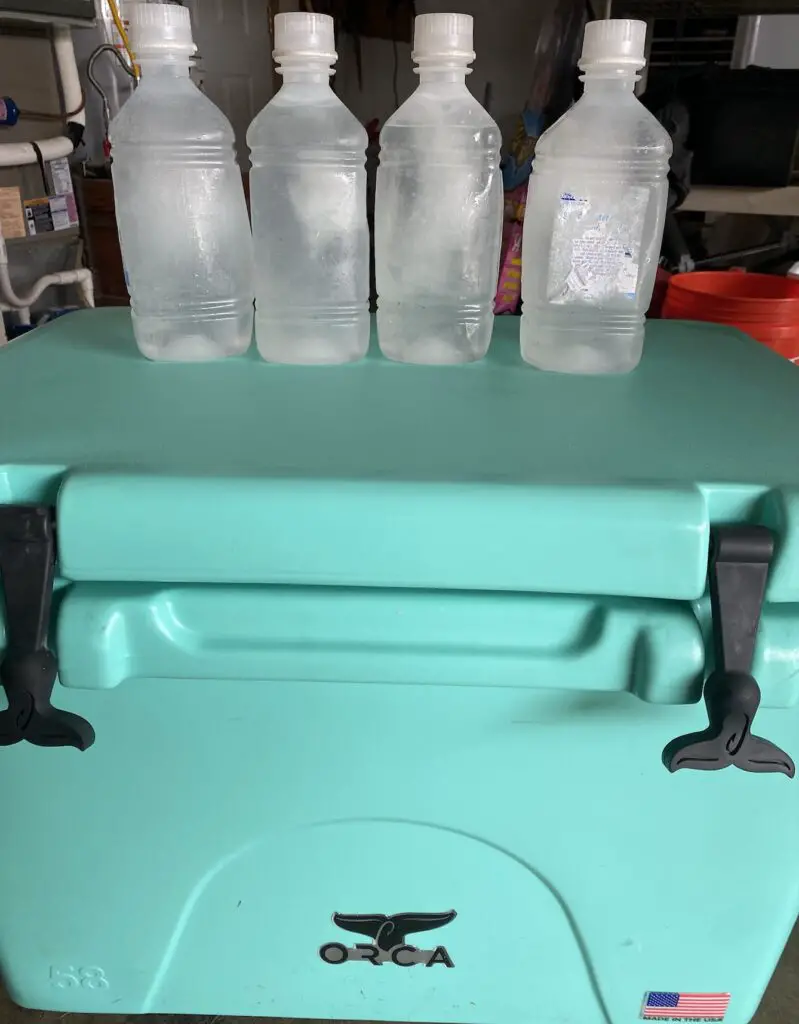
That’s my ice water bottle system…in the first 24 hours, my ice hadn’t melted at all, and in fact we froze some of our eggs accidentally from just being in the bottom of the cooler!
Those 4 previously frozen water bottles were about 50% unfrozen at the end of a 4-day camping trip in temperatures ranging from 50 to 80 degrees. That’s nuts…
Let’s clean and cook some crab!
First of all, always clean your crab before cooking them. Yes, some people will say cook them whole and eat the crab butter and all kinds of unsafe food handling practices. Clean your crab first!
But wait…did you capture some salt water in a clean water jug while you were on the water? You didn’t? That’s okay, you can salt your own water, but nothing is better than collecting saltwater in a clean area of open water to cook your fresh crab in.
And if you think you can skip the step of boiling crab in salt water, you are in for a brutal surprise.
Your crab will not taste like whatever you’ve experienced as good cooked crab if you cook it in unsalted water…I mean gross!
You can use the above method in the video…I do something similar, but I put a knife on the very middle of the crab while it’s on it’s back with the underside pointed up.
I then use a hammer, rock, or whatever to pound the knife blade cleanly through the crab and then use the same shaking method to get the gills and guts off the pieces of crab.
Keep your crabs cold after dispatching them for safe consumption. At this point, you can either vacuum seal your crab or drop it in boiling salt water for immediate consumption.
My wife’s rules for cooking crab:
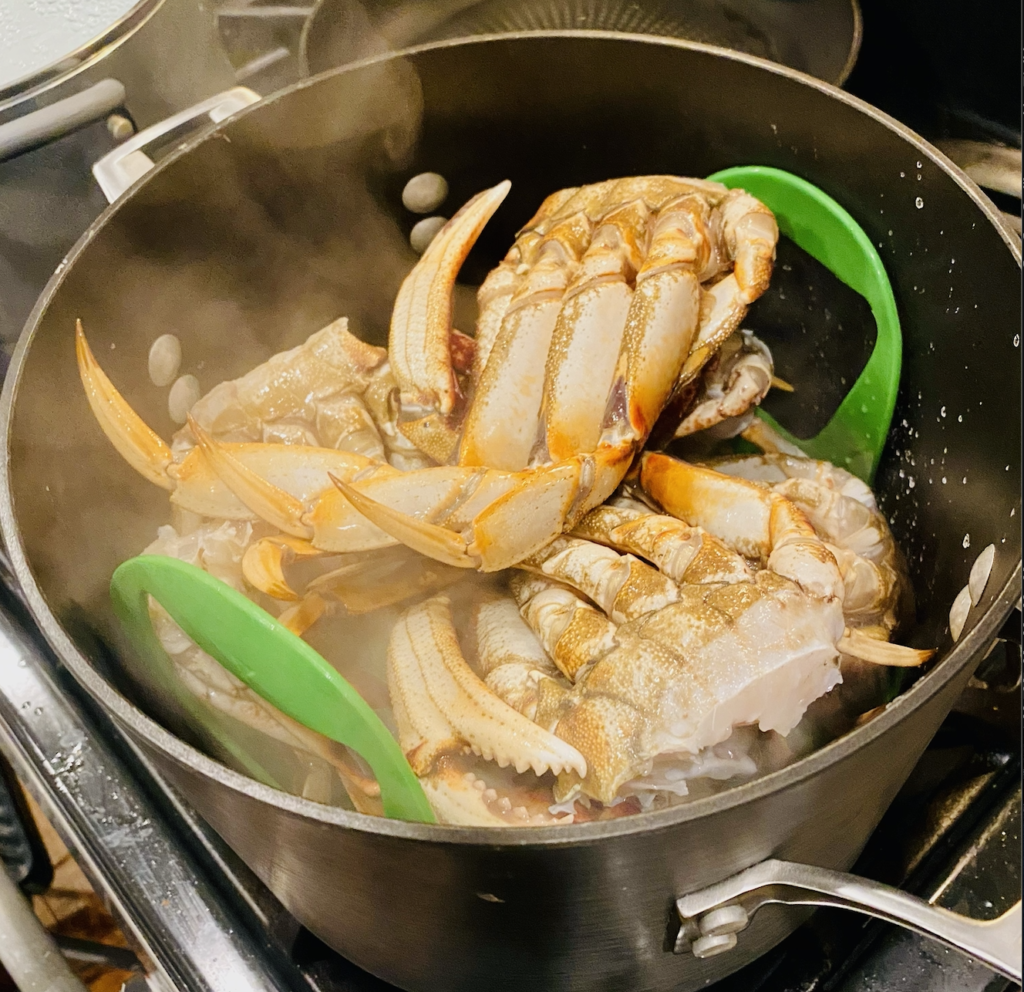
Fill a big pot with about an inch of water and put about 1 tsp of salt into that water. Get that water to a boil with high heat.
Add the crab pieces.
Bring back to a boil and cover. Must be boiling/steaming for 20 minutes.
We steam our crab which means it’s not necessary to submerge crab in the water.
We generally end up having more crab than we can consume, and our favorite method of later-consumption is to vacuum seal the raw crab wrapped in paper plates (otherwise the crab shells will puncture your vacuum seal bags) and freeze it for up to 3-6 months.
It’s not as good as fresh though (but close!).
Wrapping up on Puget Sound Crabbing
Hopefully, you now have all the information you need to go crabbing around Puget Sound and create your own crab feast.
Did I miss something? Have a question about some of the content? Feel free to leave me a comment below or message me on Instagram: @Pacificnwbestlife or Facebook: facebook.com/pnwbestlife or twitter @pnwbestlife.